And some more weaving - the Dixon Christmas Tartan?

Over Christmas, Mum and I tried some more weaving. Deciding to be a bit more adventurous, we invented a pattern which we've now adopted as our family tartan.


The work grows amazingly quickly compared with knitting.

A lesson that we learned this time is that two pieces won't necessarily come out the same length. We made two pieces on the 12" knitter's loom to sew together to make a wider piece. Although we made sure of the same number of pattern repeats, the two pieces were different enough in length to cause some puckering when stitched together. Washing and drying didn't help, so we're thinking up some new ideas for the two pieces.

More weaving

I had another skein of the hair-dyed handspun after making the mitts, and I reckoned that there was enough to weave a scarf to go with them.

It's taken a while for weaving to grab me, but it has now. I think it's the speed that your project grows. I'm also fascinated that the colours interact differently than when you knit. I'll be interested to see whether this will fluff up much more when it's washed.

Warp and weft

I've had a great weekend with my Mum. I took over a knitter's loom and we've spent some very enjoyable time learning to weave.

Mum found some lovely chunky marbled yarn, something she's used a lot for crochet.


The finished item looks remarkably good for a first effort. (I'm just washing it, which should fluff it up a bit and I'll take another photo of it when it's dry.) The most amazing thing was how quickly it grew. It took an hour or so to warp up the loom and about the same again to do the weaving.

Much happier

I've tried more swatching using the same yarn but bigger needles (6mm), and I've got the chunky look that I was after! The first swatch, made with 4mm needles, is on the left. I've tried some k2p2 and k1p1 ribs which look great and I'll use those in the project.

Thinking about the Ravelympics

You know when you have something in your head, and when you start working on it, everything looks just as good as you'd imagined? Well this isn't one of those times.

I'm looking forward to the Ravelympics (Go, Team UK!) - it'll be great to have the motivation and encouragement to get something bigger done more quickly than my usual snail's pace. However, without the details of the events, I'm guessing at what I might do.

I have a big project in mind that might be ideal. I'm going to spin and knit a cardy/coat, based on the design of a much-loved Marks & Spencer one that's on its last legs. So I've started spinning samples and knitting swatches.


Too lazy to use the tripod, my photos of the sample skein are awful (this is the best photo by far), but I *am* very pleased with the yarn. It's corriedale undyed, medium colour.

I thought it was about the right 'chunkiness' but the first swatch is nowhere near as chunky as I'd had in mind. It's about 12 wpi, which is the same as that which I made for my recent mitts, and they feel very chunky. Maybe it's because they are a ribbed pattern.

I'll try another with bigger needles (these are 4mm), try some ribbing and failing that I'll try spinning a bit chunkier.

How does brown wax polish finish a new spinning wheel?

Personally, I really like the light colour of a brand new wheel straight out of the box.

I've seen wheels that have been finished with a dark stain, a coloured varnish or teak oil. All look good, but a good shine with clear wax does it for me.

Over time the wood darkens anyway. After even a few months, the wood is noticeably darker.

Some wax polish contains dyes which puts a little warmth and colour into your new wood. So how does it work on the natural wood of a new wheel?

To find out, this is brown Antiquax on a new Traveller wheel.


I like to use a brush to apply the wax (whether it's clear or brown). I think it might be more economical because the brush absorbs less than a cloth does. It's also easy to get into the crevices.

The first thing I notice is that it's much easier to see where you've been than with clear wax! It really does apply a beautiful colour to the wood.


It's scarily dark and lumpy when you apply it, but once buffed up the colour becomes very even. Some parts do seem to take the dye better than others, so there's a little bit of a difference, but I think the finished wheel is much more even than the variation in the colour of the natural parts straight out of the box.


The resulting colour is a beautiful bronzy-brown, not too dark. I've stood the finished wheel next to one polished with clear wax as a comparison. There's quite a difference which I don't think this photograph shows. I'm very pleased.

Antique wheel

This wheel has been used as a shop window prop in a knitwear shop. The previous owner didn't know anything about it other than that it may be russian. It's certainly very old, it's beautiful and fascinating to look at.

It is usable, I've put a drive band on it and successfully spun some wool, but it's not an everyday wheel. A decorative item which could be used for fun occasionally!


Finished project!

This Ashford Traditional wheel came as a box of bits, minus a few bits of hardware.

It's taken some time to get hold of the right crank. At some point, Ashford moved the crank pin from the middle of the hub to the side.

The right one arrived this week and here's the complete wheel, a mature lady but in fine fettle (like me).

Ideas for greetings cards


I've been enjoying knitting some miniature things to try out some greetings card ideas. It's easy to spin and knit the object and print the card in an hour or two.


The coloured pencil is a pattern from Flutterby Patch. I've knitted a couple and altered the pattern - I like working 'tip-up' and increasing rather than decreasing. I've also made it as i-cord rather than sewing it up. I'm sure if I make a few more I can get them much neater.

I knitted these things on very thin dpns - not the coctail sticks! I like the idea of including the sticks on the cards though as if the items are being knit. I especially like the idea of the pencil writing something while it's still a wip itself.

These will look a lot better when arranged and stuck down (no glue in the house and I'm not going to the shops today).

[Update] I've finally managed to get some UHU (it's behind-the-counter stuff now - I felt like a criminal buying it), stuck the bits down and replaced the photo above. They look much better.


Treadle joints - flexible and leather

I've had to replace two treadle joints this weekend, and thought that it might be a good opportunity to write about the subject with photos, because sometimes people seem unsure about which type to order.

The treadle joint on my Haldane has broken this weekend. (Why does it always happen when you eagerly sit down to start spinning?? I suppose the lesson is to always keep a spare one handy.) It's sometimes called a con-rod joint. the con-rod (connecting rod) is the long piece of wood joining the treadle to the crank.


Both the treadle and the con-rod have round holes to take this round, flexible type of joint. Thin screws go through the joint and hold it in place. On inspection, the Haldane's joint is slightly wider than the Ashford type. It was quite tricky to dig out the bottom bit because it had broken off flush with the wood! Often they break where the screw has gone through.


Fortunately, the type I keep does still fit and works a treat.


This is the very old Ashford Traditional I'm rebuilding from a box of bits. The original owner did find some of the hardware, but I have had to buy some suitable screws and I'm still waiting on the right type of crank. Its treadle joint was in place but broken. Older Ashford wheels use a different type of joint, flat and made of leather. Fortunately still readily available. Note that the con-rod and treadle bar have slots rather than holes.


With both types, be careful not to overtighten the screws, particularly with the flat type - it's possible to crack the wood.

Remember the hair-dyed handspun?

The 4mm needles have knitted these up extremely quickly. In fact I thought I was going to finish that second one in a single sitting. But not quite. Not even with the extra hour that the move from BST to GMT gave me.


I love the colours, and I love the way they've worked out. There's a vague spiral to the colour changes, in the opposite direction to the spiral of the rib pattern. I also like the look of skein-dyed wool.

Ta-daaaaaaaaa! I don't think I've ever taken something from cast-on to cast-off in a week.


And they're warm too! I've finished them just in time for the weather to turn milder.....

[edit] Pattern was linked in an earlier post, but for those who have asked: http://www.canadianliving.com/crafts/knitting/cosy_knitted_handwrist_warmers.php

More outdoor knitting

Dilemma: too nice to sit indoors, but dying to get on with some knitting.

It's well and truly autumn now, but Sunday seemed a pleasant enough day to sit outside. I was itching to begin knitting some wrist-warmers from my hair-dyed handspun and so I hastily printed off the pattern, grabbed that skein of wool and some new 4mm Symfonie DPNs and headed for one of my favourite spots close to my house, right in the middle of the still-young National Forest.


I started knitting straight from the skein, too impatient to wind a ball. here it is before I start casting on.


Well, the sun stayed out for a while, long enough for me to cast on and get a few rounds done. The pattern I've chosen is Cosy Knitted Hand Warmers.


A couple of days and a few rounds later.... (you can see that I've now bothered to wind a ball from the other end of the skein). I'm lovin' the spiral rib pattern and also the way that my colours are distributing themselves. I love 4mm needles - these are knitting up soooo quickly!

Can I spin the hair from my pet?

"Can I spin the hair from my pet?" is a frequently-asked question. Usually, pet hair is short, which makes it more difficult to spin, though in the past I have successfully blended very short dog hair with some longer sheep wool as a 'carrier'.

A friend brought over some amazing fur from her Alaskan malamutes. She had taken the softest fluff from the dogs' bellies and painstakingly removed the guard hairs. What was left looked like the softest, finest wool. Yes, short, but long enough to spin on its own (1-1.5 inches) and slightly crimpy. It's self-coloured white to dark grey. It looked as if it had come straight off a carder, and I suppose it had, the pet brush being very much like a small carder. (I bet that dog was in heaven having its belly brushed like that!)


After a little experimentation with different thicknesses and spinning methods, we had some extremely nice samples. The resulting yarn is quite fluffy, but in a soft fluffy way rather than hairy or scratchy. I'm sure that blending with wool would reduce this, but I quite like it and am curious about how a knitted garment would look. I've seen suggestions that the native Americans spun it, and I assume it's incredibly warm.

Can you guess what I've used to dye this skein?


Have a guess before reading on.

When I reached a certain age, like a lot of women, I began visiting Boots the chemist every few weeks for that bottle of chemical magic that covers my grey hairs.

Another thing that happens when you reach a certain age is that you have your hair cut shorter each time. I have no idea why - it's just what you do, isn't it? Therefore, nowadays I only get through about half the bottle.

Last night while looking at the left-over dye, I remembered the two skeins of plain wool I have, and a light bulb came on.

With no real idea about dyeing wool, especially with hair dye, I just squirted it on, trying not to get it too even and left it for the half-hour that you're supposed to leave it on your hair.

I give you the result! Mmmmmm ribena.

In the past I've always dyed the wool before spinning, and it'll be interesting to compare the two techniques when this is knitted up.

I'm also very pleased with my new camera. £30 from ebay plus £10 for a new memory card (They didn't say they weren't including it. Grrrr.) Enlarge the photo above to see the detail. My photos might be even better once I've got around to cleaning the previous owner's fingerprint off the lens!! You'll also see that my yarn isn't as even as I'd like. Hmmm. Maybe there's a lot to be said for crappy old cameras which hide a multitude of sins with their fuzziness.

What to make with this? I'm thinking about Toasty or Toast - or something similar with a bit of a pattern to it. What do you think? Maybe it would be in keeping to make a hat! lol.

New project!


No, not yet another cast-on, but a spinning wheel. Or rather a box of bits. Hurray. Short of hardware. Hmm.

Screws etc aren't going to be a problem, but missing crank might be. Have made enquiries about the 'clunking wheel kit' which I think might do the trick.

It was hardly used before it was dismantled and stored, it should look as good as new when polished and assembled!

Clematis Spinnning Wheel

My Tiffany-inspired clematis Ashford Traditional is finally together with all parts buffed to a nice wax shine, and I'm absolutely delighted.


Patience isn't one of my strong points when I'm working on something that I'm so excited about. I'm managing to get a really nice wax shine on Ashford's silver beech. Unfortunately the secret isn't anything more spectacular than elbow-grease and time, so it's taken me quite a while to get to this point. But I think well worth the wait.


The only thing I'm a little disappointed with is that there's quite a variation in the natural colour of the wood. I've never applied an artificial colour, because the wood darkens naturally with time, but I wonder in this case whether it might have been a good idea, as some of the parts don't seem to match at the moment. Does it matter? I'm confident that with time and sunlight, the lighter wood will darken and it'll be less noticable.


Scary Sunday - the first Tiffany-inspired decorated spinning wheel

It's quite a step from decorating drop spindles to taking a new Ashford Traditional wheel out of its box and making permanent marks on it. I've had this idea in my head for a while, and have put the big moment off long enough. Yesterday I had some time and found the courage to begin.


Of the three Tiffany designs I have put onto drop spindles, my favourite is the clematis (although it's not the one I've sold the most of). An important lesson I've learned over the last year is to have confidence in your own convictions - so clematis it is. In case you didn't read my previous posts, Tiffany and stained glass is another love of mine.

It's a bit like tattooing someone. Every mark is there to stay. Once I'd made all of the outlines I was very happy with the way it was looking.

Half way through the colouring-in, I got that doubtful, stomach-turning "OMG have I done the right thing" feeling.


With the decoration finally finished, I'm chuffed to bits and have to keep going back into the room to look at it. I love the way that the grain of the wood interacts with the lines and the shading of the flowers.

I've really got the hang of how to get a really good wax shine on Ashford's New Zealand silver beech. It's taking much longer to wax all of the parts of the wheel, but I want this one to really look pukka, so I'm taking my time over it.

This is the wheel itself, decorated and shinyfied. This one is taken with flash, so the photo quality isn't as good as the pics above, but once I've put the wheel together I'll take some good daylight shots of the finished thing.

Working my gussets

Can we invent 'crap flash photography wednesday'?


Yesterday was the equinox and the days are getting noticeably short now, which means even more flash photography, which frankly isn't a strong point for my old brick of a camera. I guess it's time to put it out to grass and get myself a newer model while payday is still recent enough for it not to make me worry too much.

Anyhow. Having abandoned the first ill-fated effort on the Hungry Bees socks (see earlier posts) and started again with some new needles of the right size, the first sock is growing nicely.

I'm lovin' these symfonie needles, btw, they feel lovely. I like the positive feel of the metal ones, but the wooden ones are more tactile, natural and friendly.

This is quite an exciting time - I've knitted a number of heels using the simple short-row method, and that's worked very well. However, I'm sticking to the pattern a bit more rigidly on this project than I'd normally do (because of earlier problems) and that means taking the plunge and knitting my first heel flap. (See pic!) If you've done it before, you'll know that it's nowhere near as scary as it looks at first.

I'm also very happy with the way that the single yarn is knitting. No hint of a bias and no breaks. It's noticeably less even than plied yarn would be, but 1. I'll get better at making it more even and 2. who cares if the finished item has a bit of a 'handmade' look to it?

Can't wait to see what it looks like blocked. Knitting those bees and honeycomb will keep the ankle and cuff very interesting to knit.

A minor problem is that I've reached the ankle of the first sock and I'm half-way through my yarn. I was sure that I had enough for both (that was simply by guestimation rather than calculation!) So I'll have to dye and spin more of the same for the second sock (will it match?!!)

striped batts and spinning and knitting in public

It's really against character for me to get into the spirit of a national or international something day, but I couldn't help joining in on Worldwide Spin in Pubic Day.

One of my favourite spots is the secret picnic spot at the bottom end of Foremark reservoir. Fantastic view and some sun too today. Idyllic!


Have you spun or knit in public? I've started a group on Flickr - join it and add your photos - I'll show you mine if you show me yours... http://www.flickr.com/groups/1240812@N23/

So what were people watching me spin? I dug out my onion-skin dyed fibre.

I'd already spun some into yarn I called Wheatfield, and started to knit a swallowtail shawl. I can't remember exactly how I dyed this fibre, I think I dipped three lumps into the dyepot one after the other, hence three different colours.

I made some batts before I went out today. This is the first time I've tried carding a striped batt. Love it!

Worldwide Spin in Public Day

Worldwide Spin in Public Day is Saturday, September 19th, 2009.

I'm not one to buy into national or international whatever day, but I love seeing public spinning and knitting.

There don't seem to be any locations listed in the UK. I can only assume that we're all too busy thinking about talk like a pirate day instead! It's come to my notice a little bit late to try and organise something, but if you can get out to spin on the 19th, take some pictures (I will too). I'll set up a photo group as soon as I can.

Read more about Worldwide Spin in Public Day.

Power Scour - results and conclusions

The Power Scour vs washing-up-liquid project was on hold temporarily while my drum carder was out on loan. After diplomatically hinting for its return, it seems that it has a new owner as it was a cheque that came back instead, so that meant a shiny new one for me.

I should declare an interest in that I do sell Power Scour in my shop (didn't get freebies, I still had to pay for it) but I did set out on this experiment feeling a bit sceptical.


I originally gave each sample a single wash as per my normal routine, but they've now had a second wash because I was waiting for my carder and because I wanted to see whether it would help to show up any differences.

The most obvious difference now is the smell. I didn't need to bury my face in the bag this time; as soon as I started to work with the Power Scoured fleece, the gorgeous smell was wafting around.

I've spent all day carding and spinning this fleece. I treated both halves the same - teased out the locks a little and flicked the ends with a comb before running it through the carder three times.

I did notice a difference in the carding; the Power Scoured locks were noticably fluffier and bouncier in my hands, the batts sometimes felt as well-separated after the second time as the washing-up detergent batch had after the third time. I thought it pulled out into sliver more easily. I put this all down to more effective removal of the grease. This is interesting because I know some people prefer to spin 'in the grease'. I have never washed grease out so thoroughly before, but I love the feel of today's fibre, and enjoyed spinning it, so I'll certainly scour more thoroughly in future.

No surprise to find that each batch of finished nests weigh the same, give or take a gram or two (around 105g per batch from the original 200g of raw fleece.) (I had to throw away a little second cut from each batch.) And I was left with exactly the same sized handful of dirt underneath the carder for each batch.


It has taken me most of the day to card and spin. Although I did think that the Power Scour batch drafted more readily, there's no difference in the look and feel of the finished plied yarn of course.

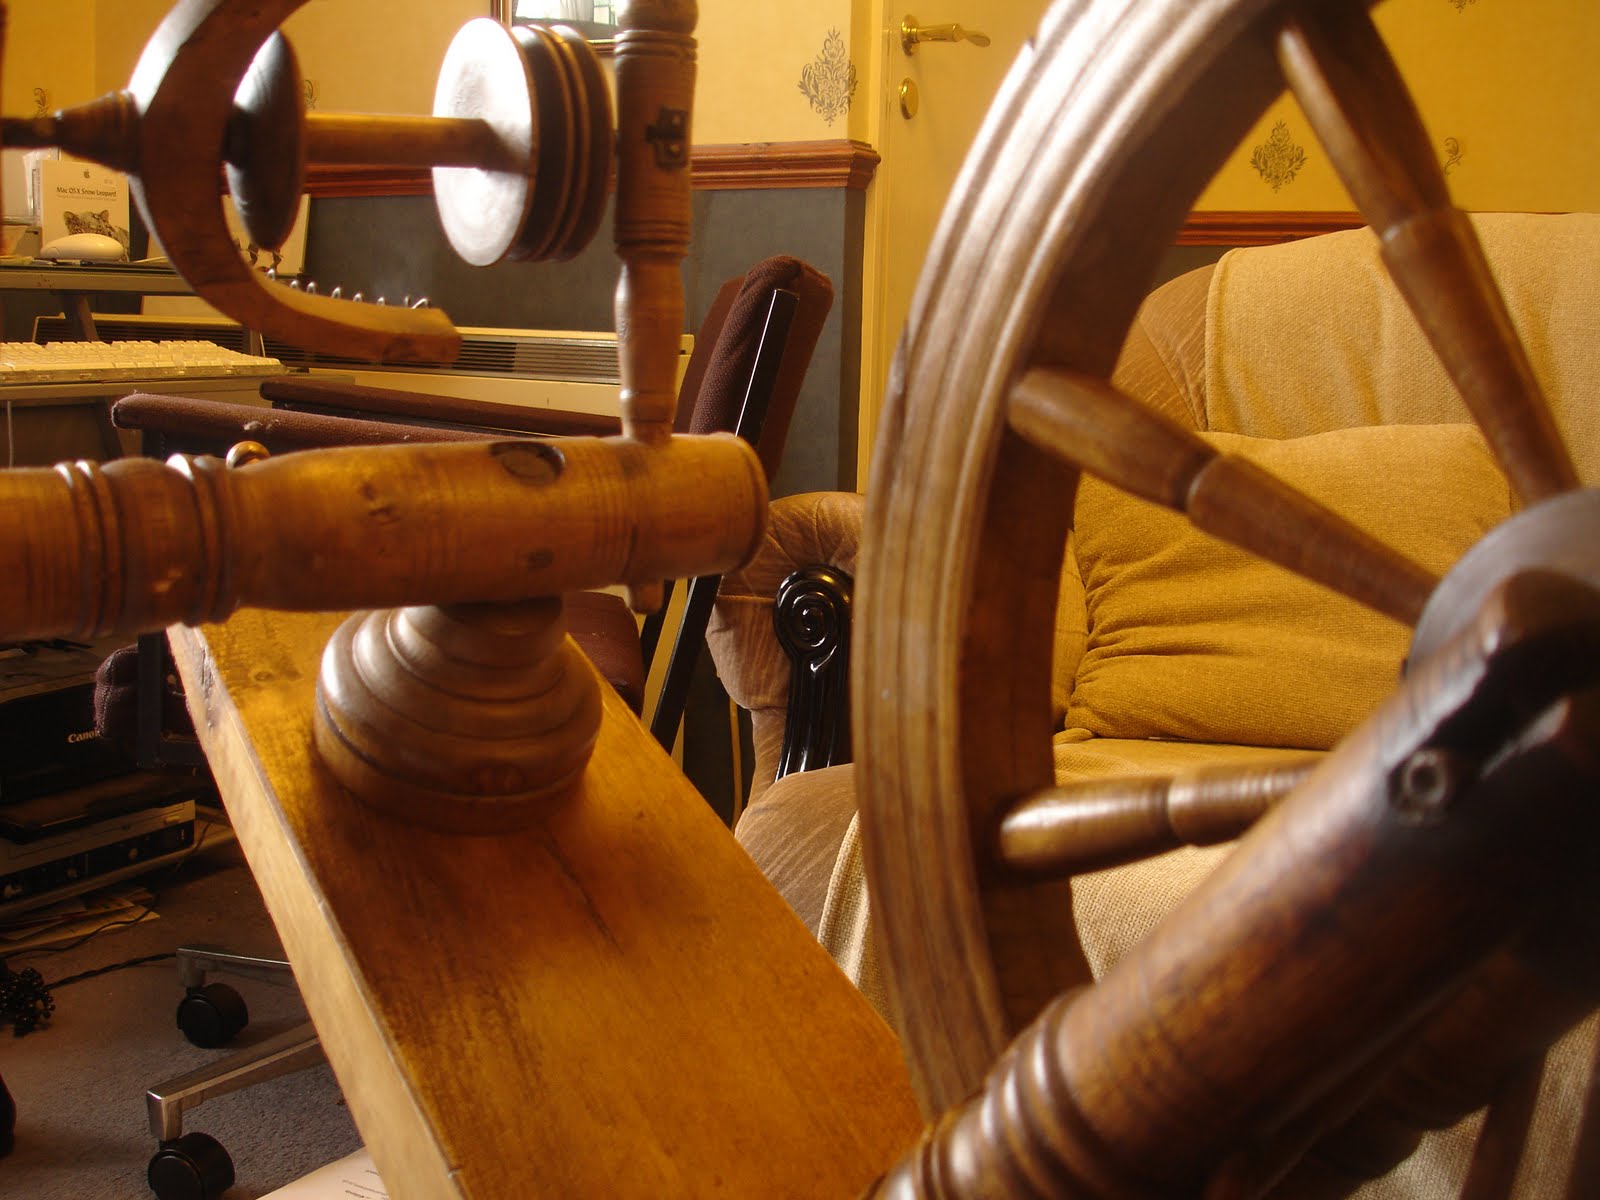
So today I've had the chance to spend lots of time getting to know my new (to me) Haldane. I bought it to re-sell but I have decided to keep it because I like it so much. As you can see, it's double-drive which is taking a little bit of getting used to, but it's far easier to use than I'd been led to believe.


I now have just over 200g of undyed creamy-white 2-ply. I was going to continue the experiment by knitting each half, but I think that's pointless. I'm listening to the two skeins, which are telling me that they're a blank canvas for some hand-painting...